Bosch IoT Insights allows you to subscribe for events and to configure the respective action(s) which will be triggered when such an event is received.
You can choose among the predefined system events and can also define your own custom events.
The custom events defined here can be produced for example by your own server or in the custom event step of a processing pipeline, as described at Configuring a pipeline.
The structure of the Event Service guide is the following:
Proceed as follows
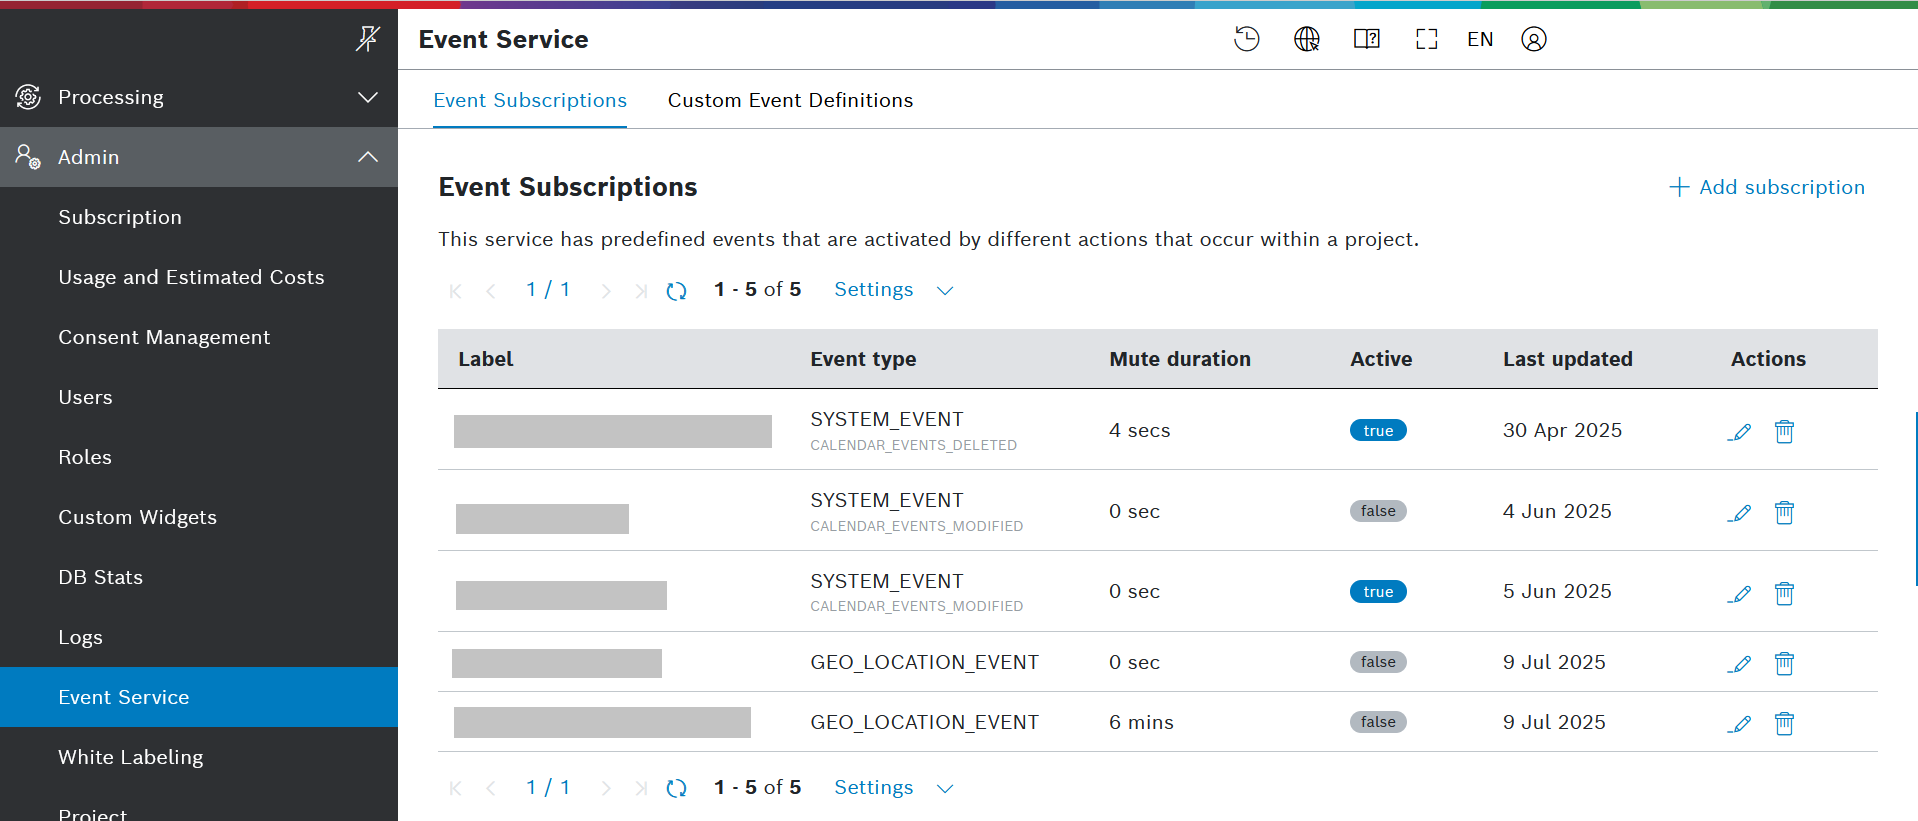
On the left navigation, go to Admin > Event Service.
→ The Event Subscriptions tab is displayed by default and provides a list of all already configured subscriptions (if any), as well as the opportunity to add subscriptions.
Prerequisites
To execute the following actions, you have to be assigned to the Admin role or higher.
Adding a subscription
To add a new event subscription:
- Click the
 Add subscription button in the top right area (see the screenshot above).
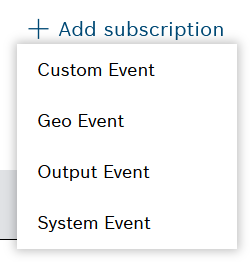
 - Select one of the available options: Custom Event, Geo Event, Output Event, or System Event.
→ The Create new event subscription view, depending on the event type, is displayed. It is identical for Custom Events and System Events and differs slightly for Geo Events and Output Events.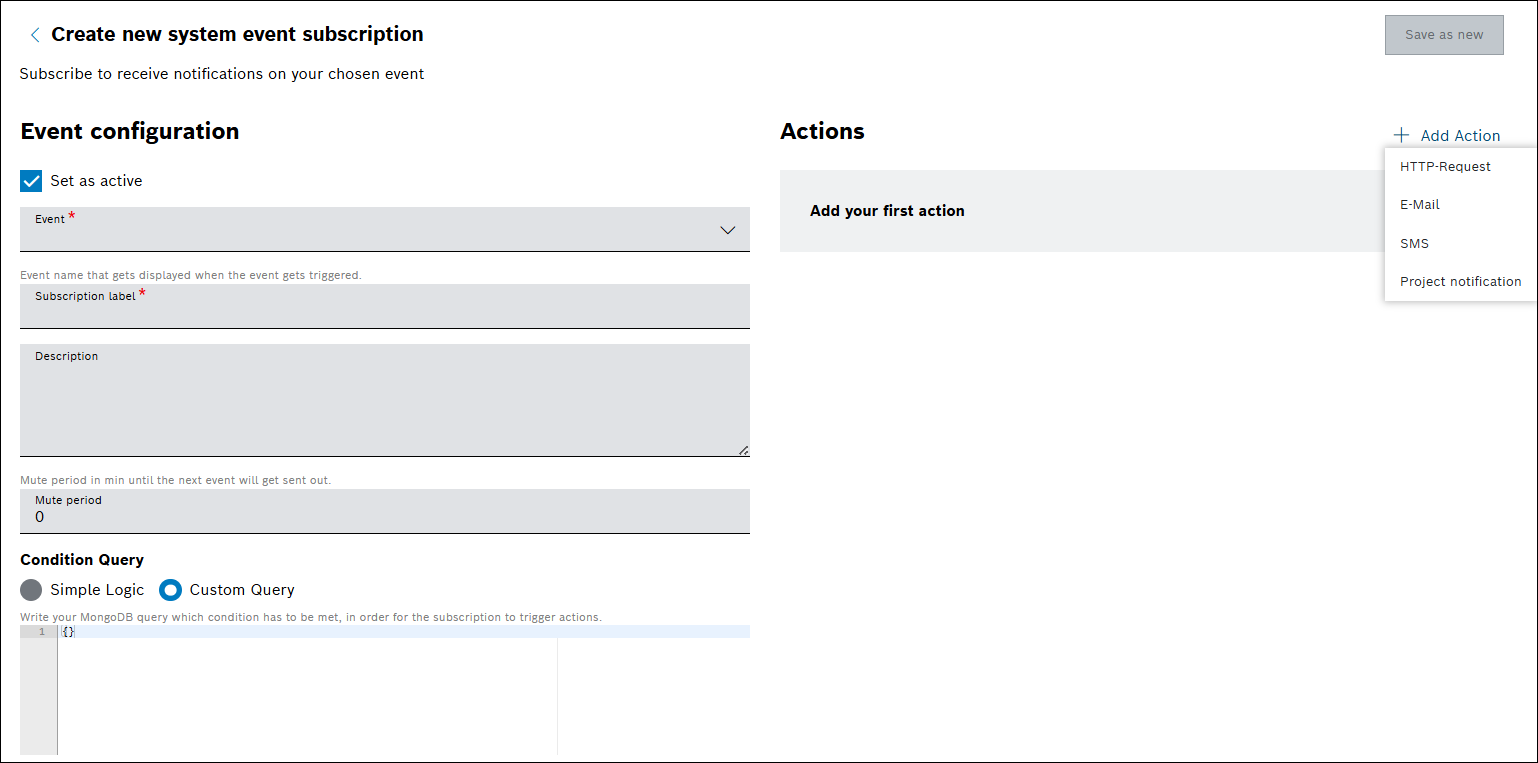
- In the Event configuration section, proceed as follows:
- In the Set as active checkbox, choose whether to activate the subscription now.
- In the Event field, select one of the predefined System events (or respectively Custom events) from the drop-down list.
This field is not available for Geo events and Output events.
- In the Collection Category and Output Events Collection drop-down menus, choose the collection for whose output events you want to subscribe.
These two fields are only available for Output events. For details about Output events, refer to Configuring a pipeline.
- In the Subscription label field, add a label for the current event subscription.
- In the Detailed description of the event field, learn more about the selected event.
For System events, a description is predefined by the system. It can be changed if needed.
- In the Mute period field, define the mute period in minutes until the next event will be sent out.
This option is useful when you do not need to receive events too frequently.
- In the Condition Query section, you can further filter the events which you will receive.
- Choose between Simple Logic and Custom Query:
- For Simple Logic, select a Path from the drop-down list, choose an Operator and a Data Type, and enter a Value.
Then, click the Add button to apply the condition.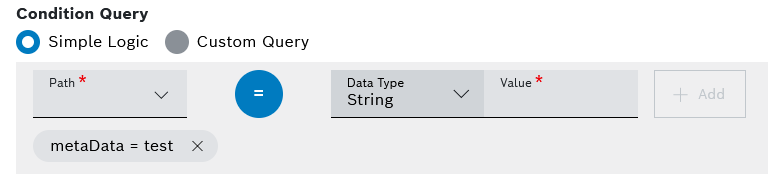
- For Custom Query (see the screenshot below), write a MongoDB query whose condition must be met in order for the system to trigger the defined action(s).
You can use the example which is automatically provided by the system in the Example Payload field for the selected event type.
- For Simple Logic, select a Path from the drop-down list, choose an Operator and a Data Type, and enter a Value.
- Choose between Simple Logic and Custom Query:
- In the Example Payload area, you will find an example of the query specific for the selected event type.
The screenshot below shows an example with the File Added event type: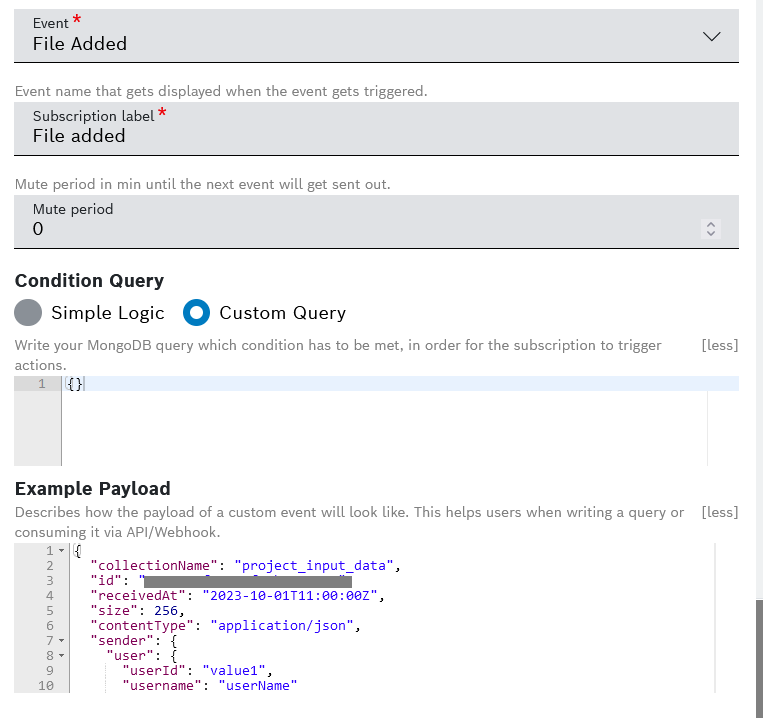
- In the Pipelines with Device Position steps area, you will see the pipelines which are producing Geo events. The hyperlinks provide direct access to these pipelines.
This section is only available for Geo events.
- In the Actions section on the right, proceed as follows:
- Click the Add Action button and select the relevant action type, namely HTTP-Request, E-Mail, SMS, or Project notification.
You must add at least one action which will be triggered when the subscribed event is received.
- Fill in the fields depending on the action type, as explained below.
Test Button
Test buttons are supported for all subscription actions based on the current configuration. Use the following buttons for validating the event configuration:
 Send Test E-Mail button sends the actual E-Mail
- Send Test SMS sends the actual SMS
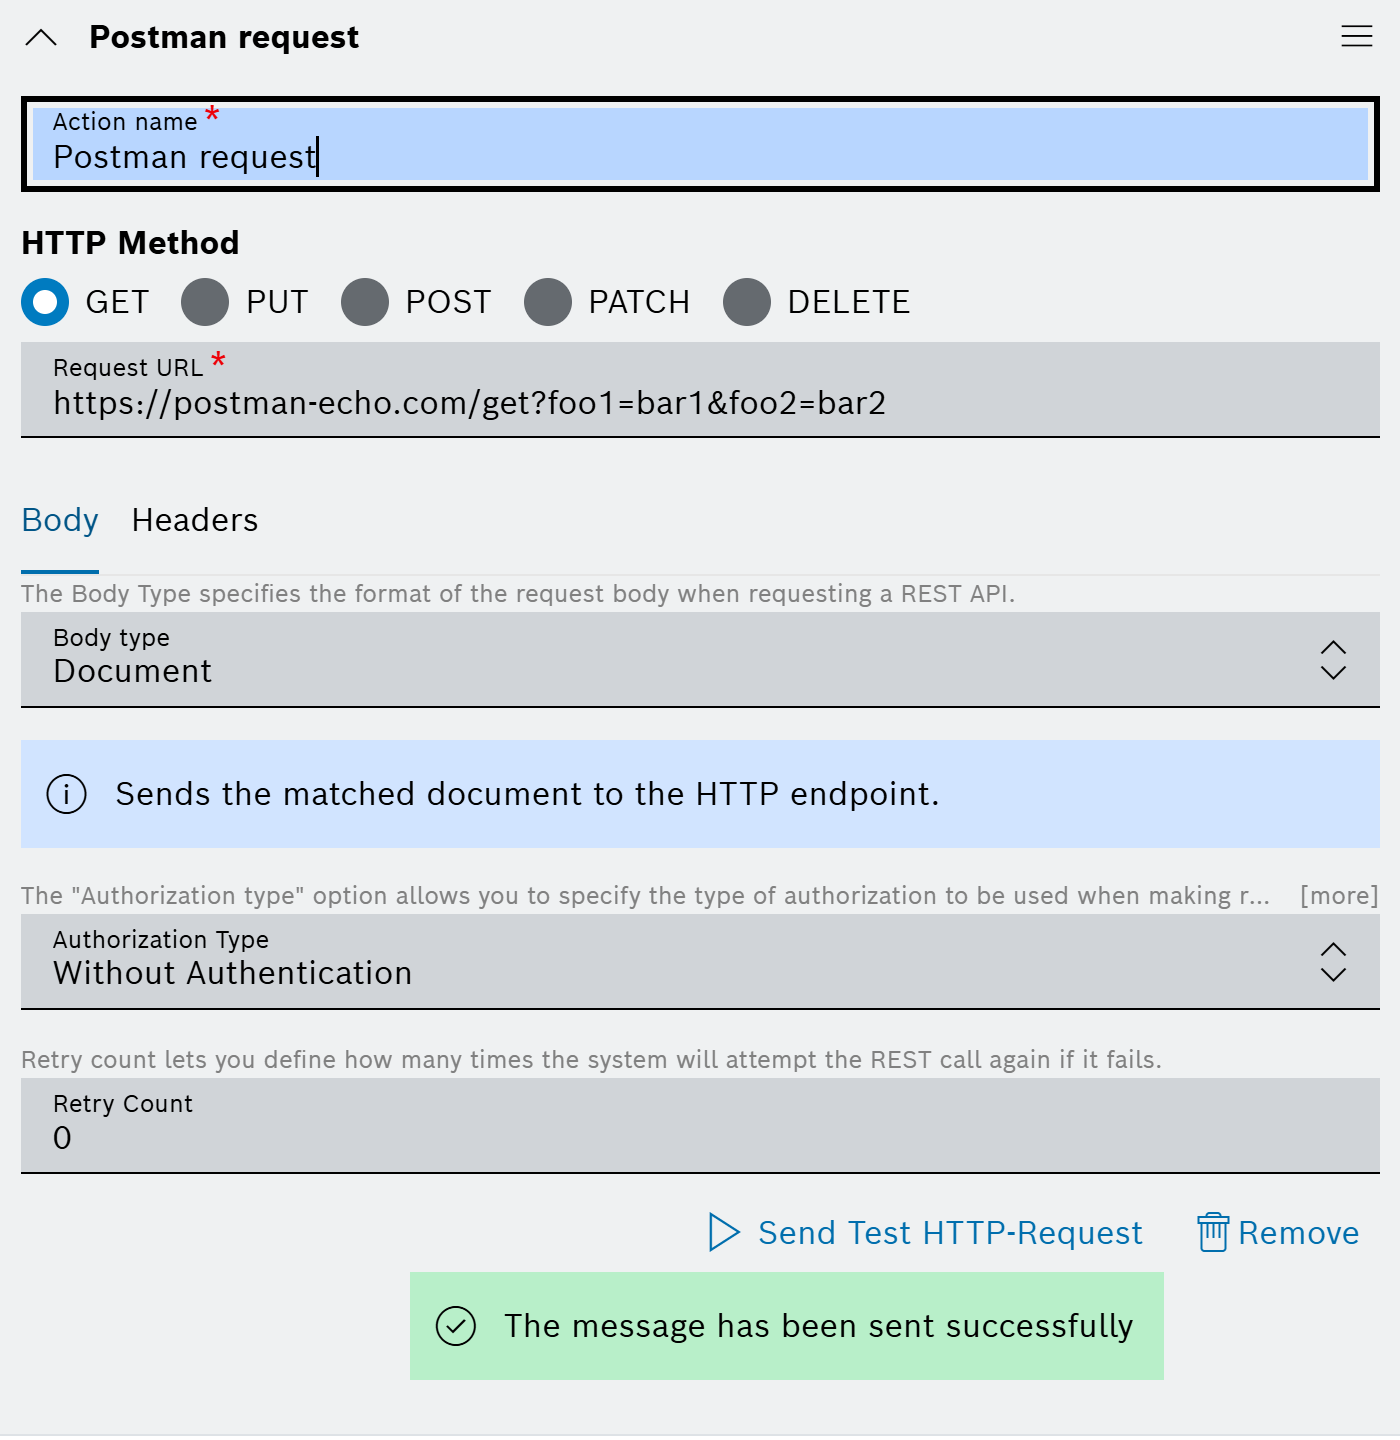
- Send Test HTTP-Request button sends the actual REST request
- Send Test Notification to myself button creates the actual notification, but only for the current user
The status appears below the button showing the loading status and the result status or error, for example:
- To remove an action, click the
 Remove icon in the action editor.
- Click the
For each action type, proceed as follows:
If you selected the HTTP-Request action type:
- In the Action name field, enter a name for the action.
- Select an HTTP method.
- In the Request URL field, enter the URL of the request.
- In the Body tab, proceed as follows:
- In the Body Type field, select the relevant body type: Raw Data, Form Data, or Document.
The Body type option allows you to specify the format of the request body when making requests to the REST API. It is not available for the GET and DELETE HTTP methods.
For Raw Data, enter the request body in the Data field.
- For Form Data, enter a key-value pair.
- For Document, the system will send the matched document (defined in the data source) to the HTTP endpoint.
- In the Body Type field, select the relevant body type: Raw Data, Form Data, or Document.
- In the Headers tab, proceed as follows:
- Click the + Add Header button for each header row that you wish to add.
- Enter a Header and a Value.
- To remove a header, use the Remove icon on its row.
- In the Authorization type field, specify the type of authorization to be used when making requests to the REST API.
Select one of the following available options:- The default option is Without Authentication.
- For Basic Auth:
- Click the + Set Configuration button.
→ The configuration dialog will open. - In the Username field, enter the username.
- In the Password field, enter the password.
- Confirm with Save.
- Click the + Set Configuration button.
- For OAuth 2.0:
- Click the + Set Configuration button.
→ The configuration dialog will open. - In the Grant Type drop-down list, select the type of credentials, namely Client Credentials or Password Credentials.
- Enter the Access Token URL.
- Enter the Client ID.
- Enter the Client Secret.
- If you selected Password Credentials as Grant Type, also enter the Username and the Password.
- In the Scope field, enter the scope.
- Confirm with Save.
- Click the + Set Configuration button.
- For OAuth 2.0 Bearer Token,
- Click the + Set Configuration button.
→ The configuration dialog will open. - Enter the token.
- Confirm with Save.
- Click the + Set Configuration button.
- For Current User Session, be aware that this option only works for service domains that belong to the current project and not 3rd party applications.
- In the Retry Count field, define how many times the system will attempt the REST call again if it fails.
- See also an example of a configured HTTP-Request action in the Action examples section below.
If you selected the E-Mail action type:
- In the Action name field, enter a name for the action.
- In the Email recipients field, enter the email addresses of the people who will receive an email notification when an event is received.
- In the Subject field, enter the email subject.
- In the Message field, enter the body text of the email.
With a placeholder like
${datapath}you can use dynamic content from the processed document for the email address, subject, and message.
Strings for datetime values with the formatyyyy-MM-dd'T'HH:mm[:ss[.SSS]]'Z'need to be explicitly followed by'?date','?time'or'?datetime', e.g.${timestamp?datetime}. - See also an example of a configured email action in the Action examples section below.
If you selected the SMS action type:
- In the Action name field, enter a name for the action.
- In the SMS recipients field, enter the phone numbers which will receive an SMS when an event is received.
- In the Message field, enter the message body that should be read by the recipients.
The character limit for a single SMS message is 160 characters. However, most modern phones and networks support concatenation; they segment and rebuild messages of up to 1600 characters.
With a placeholder like
${datapath}you can use dynamic content from the processed document for the SMS recipients and message.
Strings for datetime values with the formatyyyy-MM-dd'T'HH:mm[:ss[.SSS]]'Z'need to be explicitly followed by'?date','?time'or'?datetime', e.g.${timestamp?datetime}. - See also an example of a configured SMS action in the Action examples section below.
If you selected the Project notification action type:
- In the Action name field, enter a name for the action.
- In the Message type field, select the relevant category:
- Info - this is the standard category, marked with a blue ribbon on the notifications list
- Warning - this is the medium category, marked with an orange ribbon on the notifications list
- Error - this is the highest category, marked with a red ribbon on the notifications list
- In the Search and select role field:
- Select one or several roles from the drop-down list; all users in the project with such a role will receive the notifications
- Remove an added role through the delete icon
- In the Select users field:
- Select one or several individual users who will receive the notifications
- Remove an added user through the delete icon
You can select just roles or users, or a combination of both.
- In the Message field, define the message that will be displayed in the notification, for example A new user has been added to a project or a A new device has been created.
You can use placeholders for further convenience, for example to mention to the particular device/user/calendar event that was created/added. Use the parameters from the Example payload.
For system and custom event subscriptions, you can also use a hint from the Detailed description of the event field, which can be found right under the Subscription label field.
- In the Detail link field, enter a URL for further details. This link will open when you click on the arrow on the right of the notification entry.Feel free to use placeholders as well.
- In the Optional item area,
- Name - this customized name will be displayed instead of the selected notification category (e.g. vehicles instead of info).
Feel free to use placeholders as well.
- Link - this link can be clicked directly from the Name defined above.
Feel free to use placeholders as well.
- Icon - pick a relevant icon for further convenience when checking the list of notifications.
- Name - this customized name will be displayed instead of the selected notification category (e.g. vehicles instead of info).
- Once configured, the project-wide notifications will reach the respective project members through the notification bell icon on the header bar and the corresponding menu:
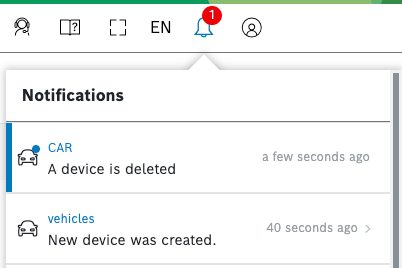
- Only the unread notifications will have the category-based color ribbon on the left.
- Older notifications will be available through the hyperlink See all in notification history at the end of this list.
Action examples
Below you will find examples of the different action types configured for the File Added system event subscription.
All actions support the use of placeholders based on Freemarker. Here are some extensions that you can use directly:
Extension | Description | How to use |
|---|---|---|
| Serializes the entire payload to JSON format. |
|
| If the provided |
|
HTTP-Request
Here is an example of a configured HTTP-Request action:
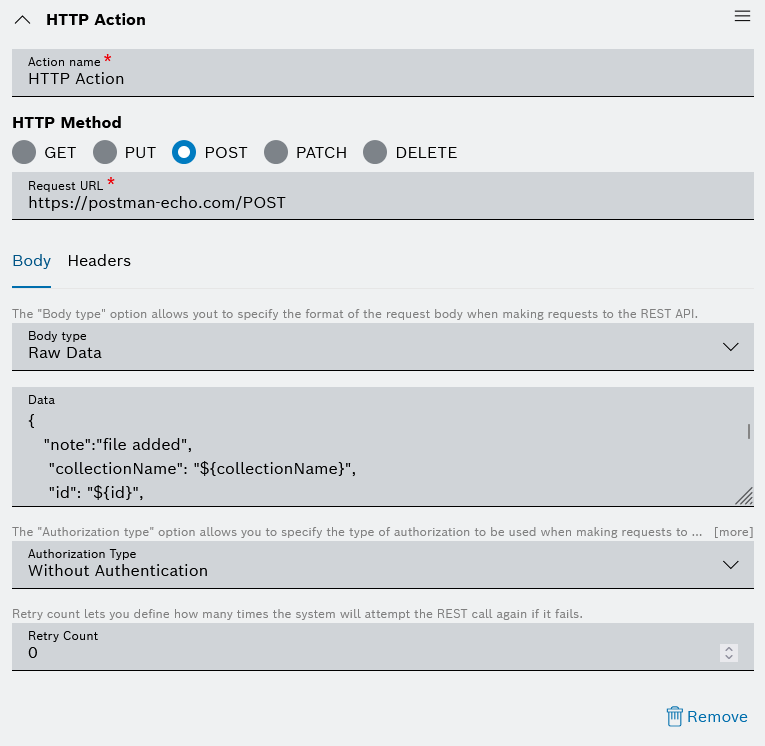
The full Data of the example above can be found here:
Here is an example of a configured E-Mail action:
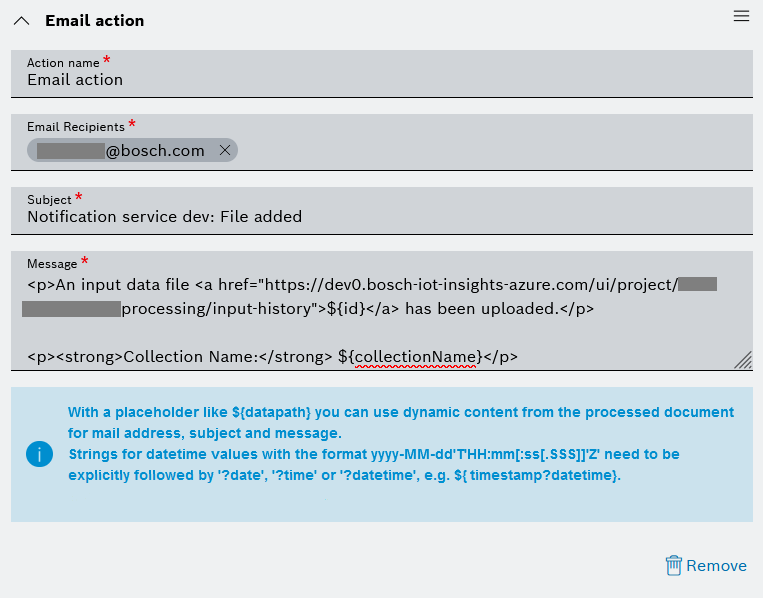
The full Message body of the example above can be found here:
SMS
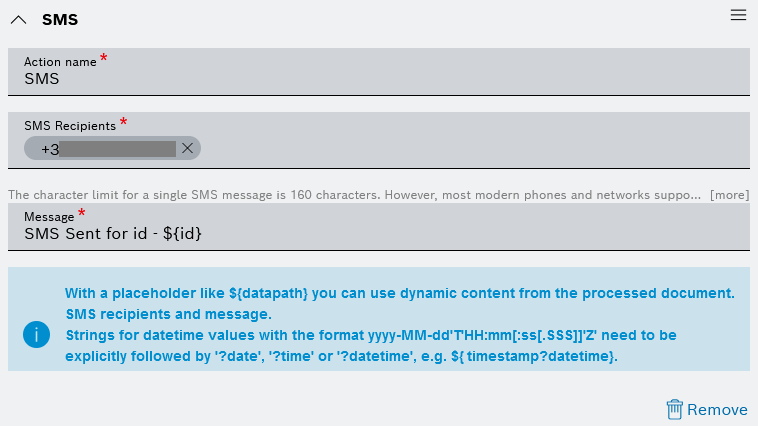
Here is an example of a configured SMS action:
Project notification
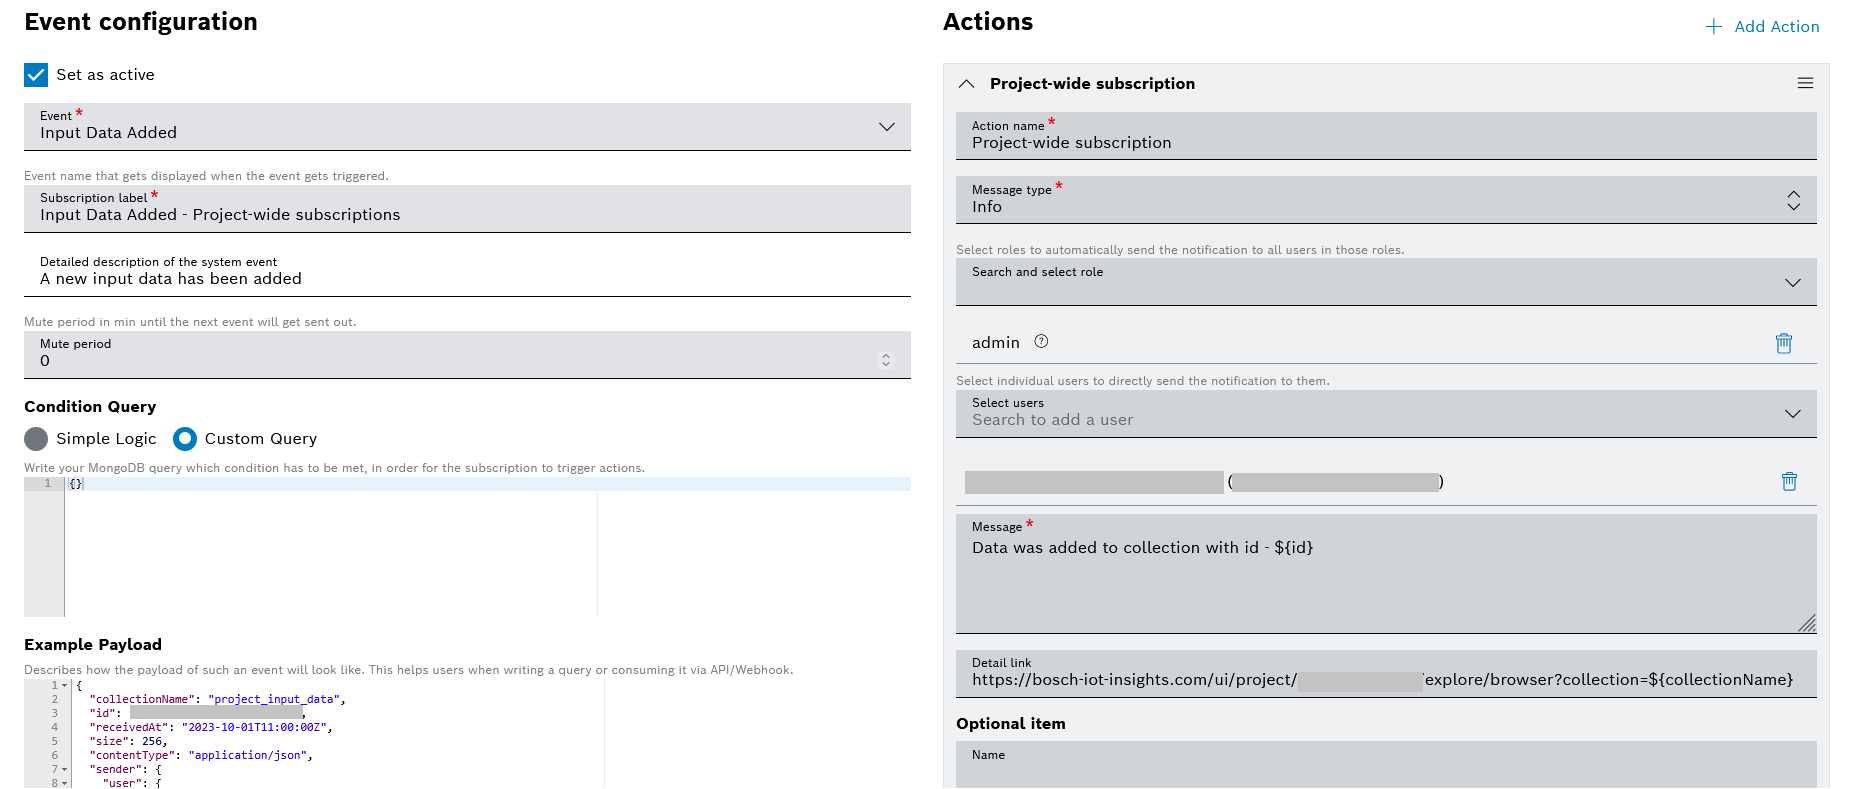
Here is an example of a configured Project notification action, for a subscription for the system event called Input Data Added:
Viewing the subscriptions
The already created subscriptions are automatically listed in the Event Subscriptions tab.
The Settings menu in the header bar allows you to define the number of results per page, as well as the columns which should be displayed.

Editing and deleting the subscriptions
To edit and delete an event subscription, use the corresponding icons on the row of the subscription.
- When you click the
 Edit icon, the Update subscription view will open, where you can make the relevant changes and save them.
Test button
Test buttons are supported for all subscription actions based on the current configuration. Use the following buttons for validating your current event configuration:
- Send Test E-Mail button sends the actual E-Mail
- Send Test SMS sends the actual SMS
- Send Test HTTP-Request button sends the actual REST request
- Send Test Notification to myself button creates the actual notification, but only for the current user
- When you click the Delete icon, a confirmation dialog will open, where you should confirm your choice.
Adding a custom event definition
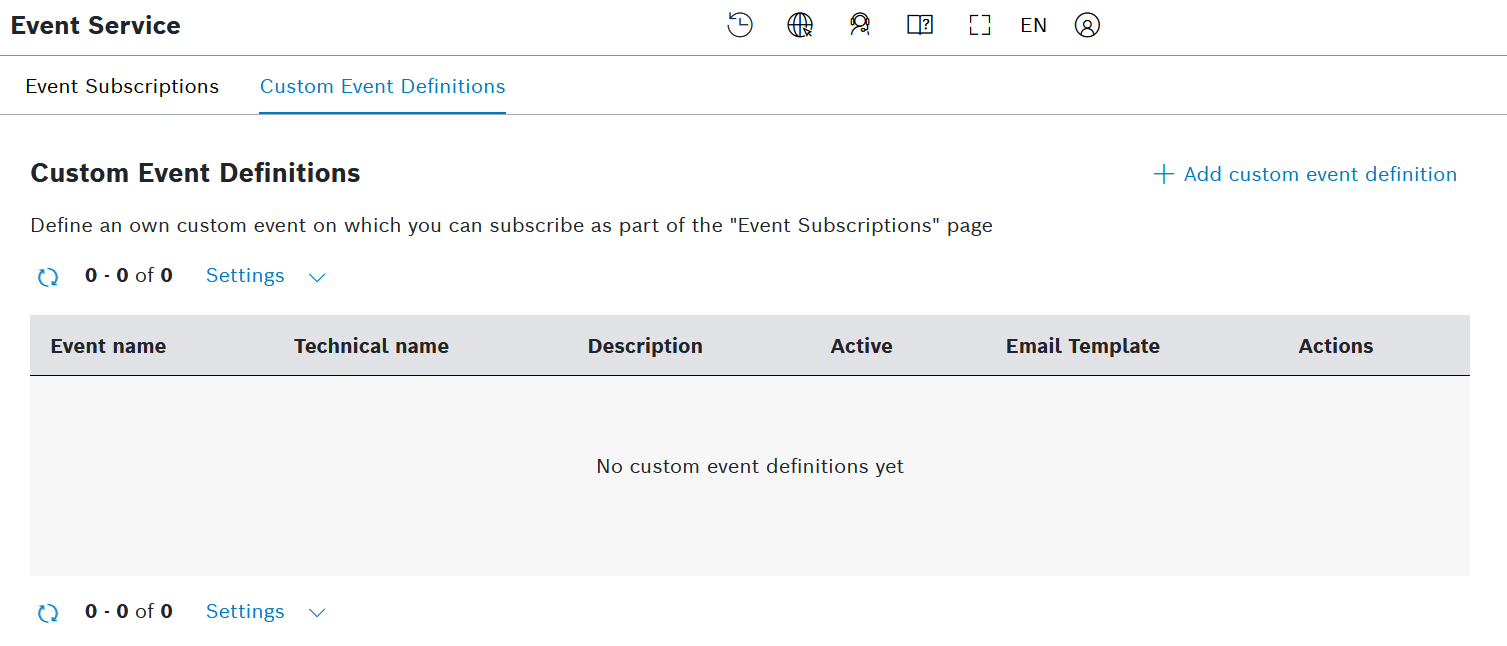
Switch to the Custom Event Definitions tab.
There, proceed as follows:
- Click Add custom event definition in the top right area.
→ The Create new custom event definition screen is displayed.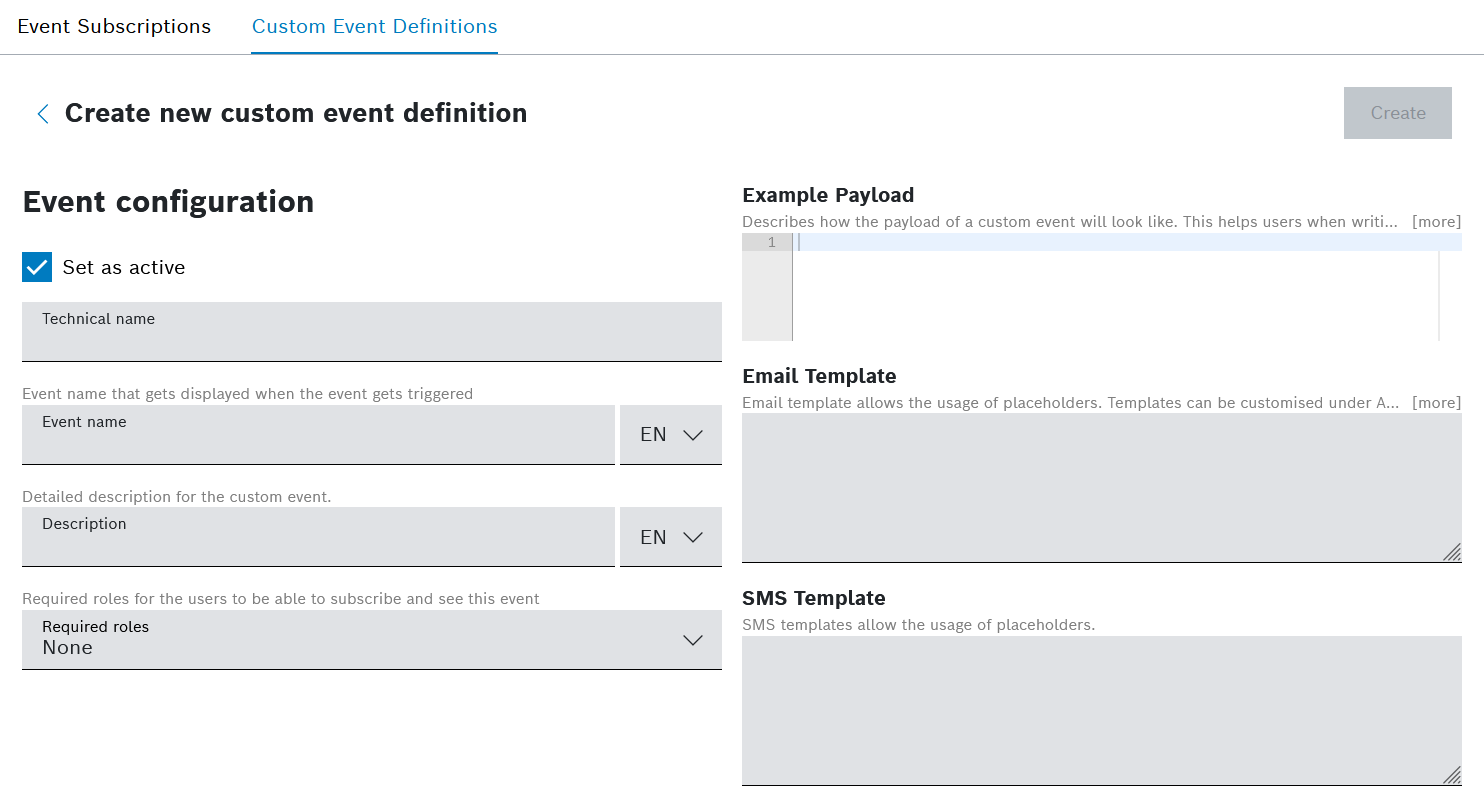
- There, fill in the following fields:
- Set as active - check the box if you want to make the custom event available for subscription
- Technical name - add a technical name of the custom event
This is the only mandatory field, the rest of the fields are optional.
- Event name - add a name of the custom event
- Description - add a description of the custom event
- Required roles - define the roles of users who will be able to see this custom event and respectively subscribe for it
- Example Payload - enter an example payload of your custom event
This will help users when writing a query or consuming it via API/Webhook.
- Email Template - define the email body that will be injected into the email template
Email templates allow the use of placeholders. You can customize the templates at Admin > White Labeling > Email Templates by adjusting the Notification template.
You can find an example of a configured email message body earlier on this page as provided for system events.
- SMS Template - define the message text that will be injected into the SMS template
SMS templates allow the use of placeholders.
You can find an example of a configured SMS message earlier on this page as provided for system events.
- Confirm by clicking the Create button.
→ The newly defined event will appear on the listed on the Custom event definitions landing page.